

I decided that for this article, I will adopt a darker tone, different to my traditional style of writing articles. I hope you enjoy the read, learn something new, and throw a couple chuckles with the audience.
Introduction
In the last five years, it has become almost a trend to require commits to follow a specific format—because who doesn’t love adding extra steps to their workflow? This kind of practice helps programmers in a monorepo understand the project’s history and, of course, tie everything neatly to those ever-so-essential JIRA tickets. Yet, despite all this, I’ve noticed that some incredibly important projects, which are already complicated enough, somehow manage to skip basic features like automatic commit formatting and testing to prevent our CI to die in the most spectacular fashion. And let’s not even talk about the lack of control over what gets pushed to the repository, as if the consequences of messy code are just a minor detail.
In short, there are more landmines hidden in code that hasn’t been properly linted, checked, or rigorously tested than you might think — each one just waiting to blow up your CI pipeline and drive up operational costs. Remember, computing power isn’t free, and every time we let CI run wild with bad code, it’s money down the drain. The more we let things slip, the less we get paid. Controlling these issues at the source isn’t just smart — it’s survival.
Motivation and goals of this article
So, in the spirit of saving the world one commit at a time, I decided to write this as a motivation to guide our community through a few simple steps to set up a project so that:
- Commits are formatted in a clear and consistent way.
- They meet JIRA's high standards.
- The code is checked, and the commit is stopped if there are errors.
- Once the code is clean, additional tasks like running tests or builds are done locally, and if everything passes, the commit is approved for the repository.
- Note #1: This article is more of a conceptual guide. Most of the code presented here is a representation of the final setup that will enable your repo to automatically format commits and execute tasks using Nx through git hooks.
- Note #2: Working on your personal pet project? Good news — you can get Jira/Bitbucket integrations even on the free plan! (Seriously, it’s not much different from integrating with GitHub.)
- Note #3: Some knowledge of Nx Framework is needed to understand some of the caveats of this article. However I am touching things behind scenes so you understand how Husky, Commitizen and Nx does certain things.
Requirements
For this to actually work, forget about any UI commit tool. We’re going to rely on a terminal, git and Nx to do things the right way. Tools like Sourcetree or the built-in Git integration in editors like VSCode and its competitors simply aren’t equipped to handle the level of power you're about to unleash. Use your UI tools to track and visualize your repo if you must, but when it comes to committing code and pushing it to your remotes, leave them behind as Nx combined with commitizen and husky will handle the commits through the terminal in the right way.
The Terminal
For my Mac and Linux friends, please skip this rant—you’re already in good hands. Your native terminals are blazing fast, leaving no room for lag or issues, and Linux commands are your daily bread and butter. This one’s for the folks stuck using Windows and Git Bash.
Once you install git on your Windows device it comes with Git Bash. But let's be honest—it’s a half-hearted fix for the terrible performance it delivers. I’m not exaggerating; it can be painfully slow at times. Instead, I’d recommend using something like oh-my-posh for PowerShell. Not only does it let you see your current branch and other neat little details, but the real advantage is that it’s way faster than Git Bash. The trade-off? You’ll need to learn a bit of PowerShell to navigate your file system and do required stuff, but it’s worth the speed boost.
If you're feeling adventurous and ready for a challenge, you can still venture into the ageless CMD terminal, armed with nothing but a Coleman lamp in the middle of a dark night.
And lint-staged? Why aren’t we using it?
Yes, it's true, everyone and their grandmother on the internet swears by mixing lint-staged with Husky.
Sure, you could use lint-staged and hope for the best, because who doesn’t love a little game of chance with their codebase? It’ll catch some issues depending on the file format. Something new pops up? Just slap on another rule and hope it sticks. But that’s like patching up a sinking ship with Flex Tape — Sure, it might hold for a while, but it’s far from a real solution. Instead, using commands like nx format or nx affected -t format is like reinforcing the entire structure. These tools integrate seamlessly with your monorepo, ensuring that every file is consistently formatted according to your project’s standards, addressing the root of the issue rather than just covering it up.

Do I need to reinvent the wheel? No, but if I can put a tire on it to make it run faster without any hassle, you bet I will.
Assumptions
In our imaginary Nx monorepo, we have Nx 19 with a traditional monorepo approach, with Angular 18, having a main app called frontend, and a shared library called ui. The git repo is using git flow to segregate development and release accordingly.
First steps
Nx is a powerful tool for managing a monorepo, so powerful that some people naively think Nx is a monorepo itself. Nx is more than just a machine for generating boilerplate code for your project. Depending on how deep you’re willing to go, you can mostly run the same commands across various types of projects using executors. And those executors? They come with their own packages and runtimes, letting your project do all the essential tasks like:
- Build
- Run
- Test
- Lint
All common in any framework and language of your choice—as long as Nx graces you with its support via the Nx Plugins Registry, which includes a surprisingly extensive list of official and community-made plugins.
Thanks to the magic of Nx Crystal (a new approach from the Nx team to make things more transparent and less bulky in the project.json), Nx can automatically infer task configurations without adding more parameters to the project.json files. We’re going to take full advantage of this to make testing and linting a more seamless experience, especially since tests can be cached, saving us loads of time when things are good to go.
With that in mind, let’s prepare the codebase.
Preparing for plumbing
I won't dive too deeply into how Jira can either make us incredibly successful developers — or leave us utterly stressed out. But here’s the gist: each project in Jira has a Code, and most of the time, every request your client has for the software you're building becomes a ticket. A Ticket is a serialized item within your project, formatted like this:
[project code]-[consecutive number]
Let's say we have a project with the code SOP, and one of our tickets on the board involves getting Nx to work with Commitizen and Husky. We need to be assigned to this task. If the task has the code 0001, then the ticket ID would be SOP-0001, with a descriptive title on the ticket such as Goat like feature, which includes all the needed "documentation" and requested goals of such task.
Jira often integrates with Bitbucket or GitHub to create the necessary feature branch from develop. My strong advice? Don’t create the branch from your terminal first. Let Jira handle that for you through the Create Branch option. Trust me, it’s better this way.
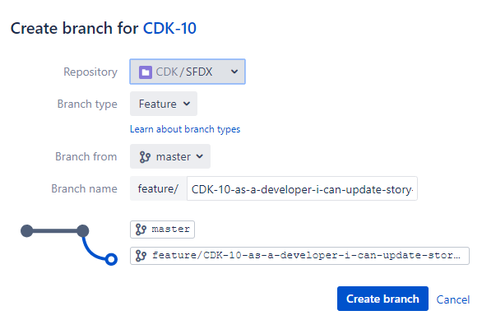
Once done, you can pull the branch from remote:
git fetch origingit pullgit checkout feature/SOP-0001-goat-like-feature
Now that we have pulled and changed our feature branch to feature/SOP-0001-goat-like-feature, we need to start to work on the plumbing of our commit process.
Installing dependencies
There are 3 dependencies we will need to install in your repo to ensure the workflow runs properly:
For the package manager, we will be using npm as the jack of all trades.
npm i -D commitizen @digitalroute/cz-conventional-changelog-for-jira husky
Once we have installed the dependencies, we need to start to prepare for things we might need.
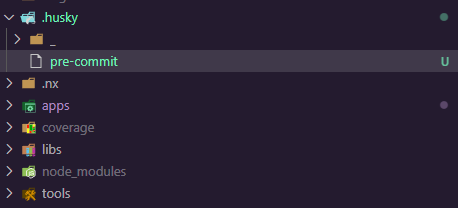
Initialize Husky and configuring it.
Husky MUST need to be initialized first. for this we run
npx husky init
That will generate the required .husky folder with the needed git hooks to use.
We’re going to take control of Husky now by using nx affected the right way.
Husky and Nx Commands
nx affected leverages git history to identify what’s changed compared to the current commit. That’s what makes it so powerful and why I’ve ditched lint-staged—because nx affected will automatically format the affected files without breaking a sweat.
Assuming our development branch is the base branch and holds the last clean commit, we’ll use it as the reference point for detecting affected changes:
npx nx affected -t lint format test --base=origin/develop --parallel=5
One command to do three critical things:
- Ensure that affected files are fully linted with all the rules in play for their respective projects.
- Make sure that tests for affected projects are running without a hitch.
- Automatically format the affected files.
All of this happens in parallel with up to 5 threads! I warned you we’d push this, but depending on your machine, 5 threads might be overkill, so use it wisely and adjust to your own device needs. Depending on how your Nx Repo is originally configured, by default, build and test are cacheable items. If you’ve made minimal changes in the ui library but none in the frontend app, this command will only lint, format, and test the ui—because the previous commit from origin/develop for frontend remains unchanged, and the test for frontend will just pull the same snapshot result.
The dangers lurking on caching
A word of caution for those who like to live dangerously and ignore good advice: I strongly recommend not caching lint and format, because that comes with a host of problems:
- Stale Results: Caching lint and format checks might seem clever, but it’s a ticking time bomb. Every time you make a code change, you’re risking relying on outdated information. As your codebase evolves, those old, cached results won’t catch new issues, leaving you blind to potential disasters.
- Inconsistent Code Quality: Caching can let subpar code slip through the cracks. Code that doesn’t meet current linting or formatting standards might get a free pass, leading to a patchwork of inconsistent quality across your codebase—like letting some parts stay stuck in the past while others move forward.
- Performance Issues: Caching might look like a shortcut to better performance, but it’s a trap. Over time, it can actually slow down your CI checks as they start running on more files than necessary. Instead of being efficient, you end up dragging the whole process down, like carrying extra baggage you don’t need.
- Breaking Monorepo Principles: Monorepo development is all about rebuilding, retesting, and relinting only what’s truly affected by changes. Caching throws a wrench into this by giving you a false sense of security, ignoring the current state of the codebase, and undermining the very principles that keep a monorepo running smoothly.
Now that you understand why caching lint and format is a bad idea, let's see what husky can do for us along with Nx.
Command approaches for big and small projects
Open the pre-commit file in the .husky folder and paste this command:
nx affected -t lint format test --base=origin/develop --parallel=5
Now, this approach might work for small projects, but larger ones will definitely struggle when it comes to testing. What if the affected project only has ONE component that needs testing? Do I really need to drag the entire test suite through the mud for that? You’ve got two options here:
Option 1: Leave the test to run only affected code: For this, you’ll need two commands:
nx affected -t test --onlyAffected --base=origin/develop --parallel=5
nx affected -t lint format --base=origin/develop --parallel=5
The key here is the --onlyAffected flag. When you use the --onlyAffected flag with the nx affected -t test command, Nx will narrow down the execution to only those projects directly impacted by your changes. This means it will not just consider projects dependent on the changed files but will also ensure that only the tests for the truly affected projects are run.
or
Option 2: Leave the testing to the CI: You could simply lint and format, and let the CI to be at the mercy of your tests. But remember, testing is a responsibility that demands careful handling. Neglect it at your own peril.
Adjust as needed and save it. Now, the next part of this operation will focus on configuring our commits with Commitizen and its cz-conventional-changelog-for-jira plugin.
Commitizen and cz-conventional-changelog-for-jira
This duo is probably the best thing you can have to format your commits, as Commitizen alone lacks the necessary options to embed the Jira Ticket into the message for us.
First, in your package.json, create a script called commit that will handle the heavy lifting:
{
    "scripts":{
        "commit" : "git add --all && git-cz"
    }
}
Pretty self-explanatory: add all the changes and run Commitizen.
For cz-conventional-changelog-for-jira, you have two options: either bloat your package.json a bit with an additional config key, or generate a .czrc file to add an additional config file to your repo.
If you choose to bloat your package.json, you need to add the following:
{
  "scripts": {
    "commit": "git add --all && git-cz"
  },
+  "config": {
+    "commitizen": {
+      "path": "./node_modules/@digitalroute/cz-conventional-changelog-for-jira"
+    }
+  }
}
Or, if you opted to add a .czrc file:
{
    "path": "./node_modules/@digitalroute/cz-conventional-changelog-for-jira"
}
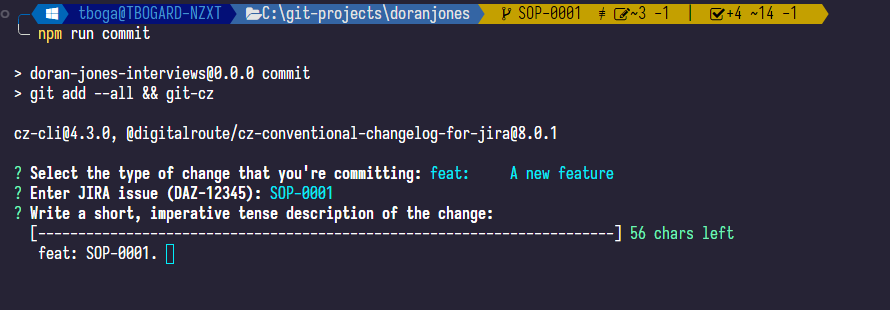
Now, running npm run commit should produce something like this:
But don’t start to celebrate too early—we’re far from done. It’s quite possible that your CI and integration team has set up some nasty formatting requirements for commit messages.
For example, based on the demo above, your message might look like this:
SOP-0001 feat: Adds a cool feature
But what if your CI team insists on a slight change:
SOP-0001. feat: Adds a cool feature
Did you see that (dot)? That simple DOT could throw your entire commit into instantaneous chaos, with the CI team laughing in your face (trust me, I’ve been there).

Yes, right in the gut, and in your ego. You might want to take a moment to learn how to amend your commit with the right format before making the commit to get in worse shape.
So, to prevent this distopic nightmare, we will assume you added the .czrc file to your code repository. Fortunately, cz-conventional-changelog-for-jira contains a wide variety of options to format our messages properly. If you were thoughtful and read the whole page for cz-conventional-changelog-for-jira instead of scrolling this article without a significative purpose, you would see formatting options that can help us to format the message as needed. The needed option is jiraAppend and the value represented will be the damn dot:
{
-    "path": "./node_modules/@digitalroute/cz-conventional-changelog-for-jira"
+    "path": "./node_modules/@digitalroute/cz-conventional-changelog-for-jira",
+    "jiraAppend": "."
}
Now, next time that you run npm run commit you will see the message to be in compliance with the clowns of CI once you push your code to remote. Now you can laugh back at them.
We can go now step by step on it and ensure things goes the right way:
Run the npm run commit will welcome me to the commitizen interface
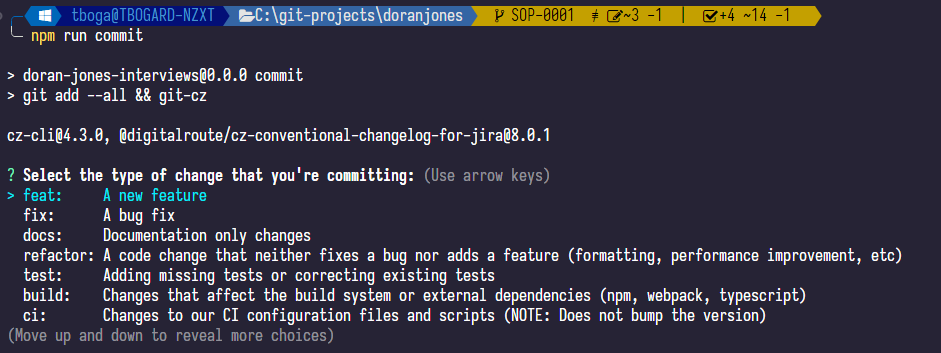
After picking feat: a new feature, it will greet me with the JIRA Issue. you might see grayed down our Jira Ticket SOP-0001 (Note that it has the dot append as we configured in the .czrc file), which by hitting enter will become by default the ticket to be used. Of course you are free to input a different ticket, but you won't want to have the CI clowns after you blocking your code to do the work of other dev.
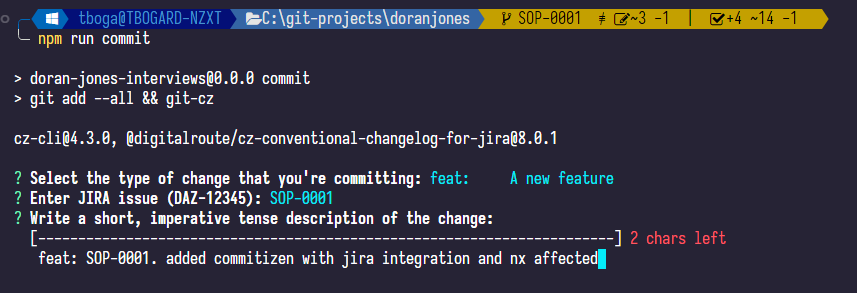
now include a description accordingly to your needs
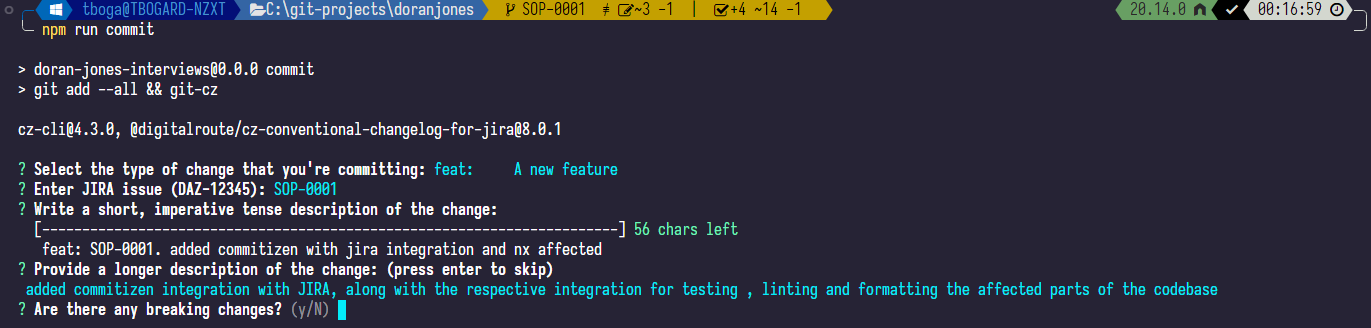
if an additional description is needed to clarify your work, you can add it in this prompt, otherwise press enter. The final prompt would be if you are including breaking changes.
once you hit enter, you will have a preview of your message (just what everyone reading this article wanted)

You can either cancel the commit and do more changes, or press enter to confirm the commit message.
If you decide to commit, from here every affected project will run the required targets (lint, format and test). From here, if something fails, you might need to fix it
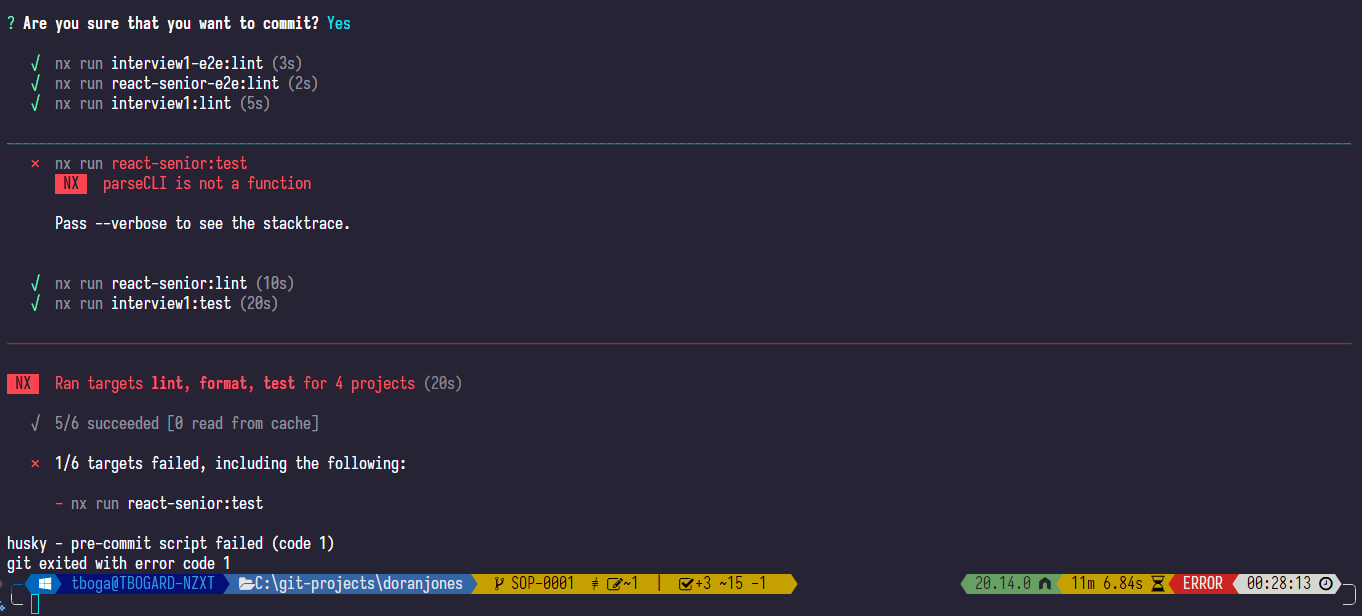
DO 👏 NOT 👏 STOP 👏 HUSKY 👏
Know this: if the nx affected command fails, your code will be reverted to the state it was in before your commit preparation. In large commits, DO NOT ATTEMPT TO PRESS CTRL + C, as your changes are in a fragile middle stage.
Behind scenes, Husky uses git stash to move your commit code to a rollback state if something goes wrong with nx affected. If you deliberately interrupt the process (for example, because you spotted a life-altering typo like "featre" instead of "feature" and suddenly it feels like the world is ending), SOMETIMES Husky will do more than just ignore your changes—it might toss all your hard work into the twilight zone, turning your precious hours of coding into a nightmare to recover. The first time it happened to me, my soul left my body without a trace. But hey, if you enjoy living on the edge, there’s always the stash created by Husky to pull you back from the brink. LET HUSKY FINISH. YOU HAVE BEEN DEARLY WARNED.
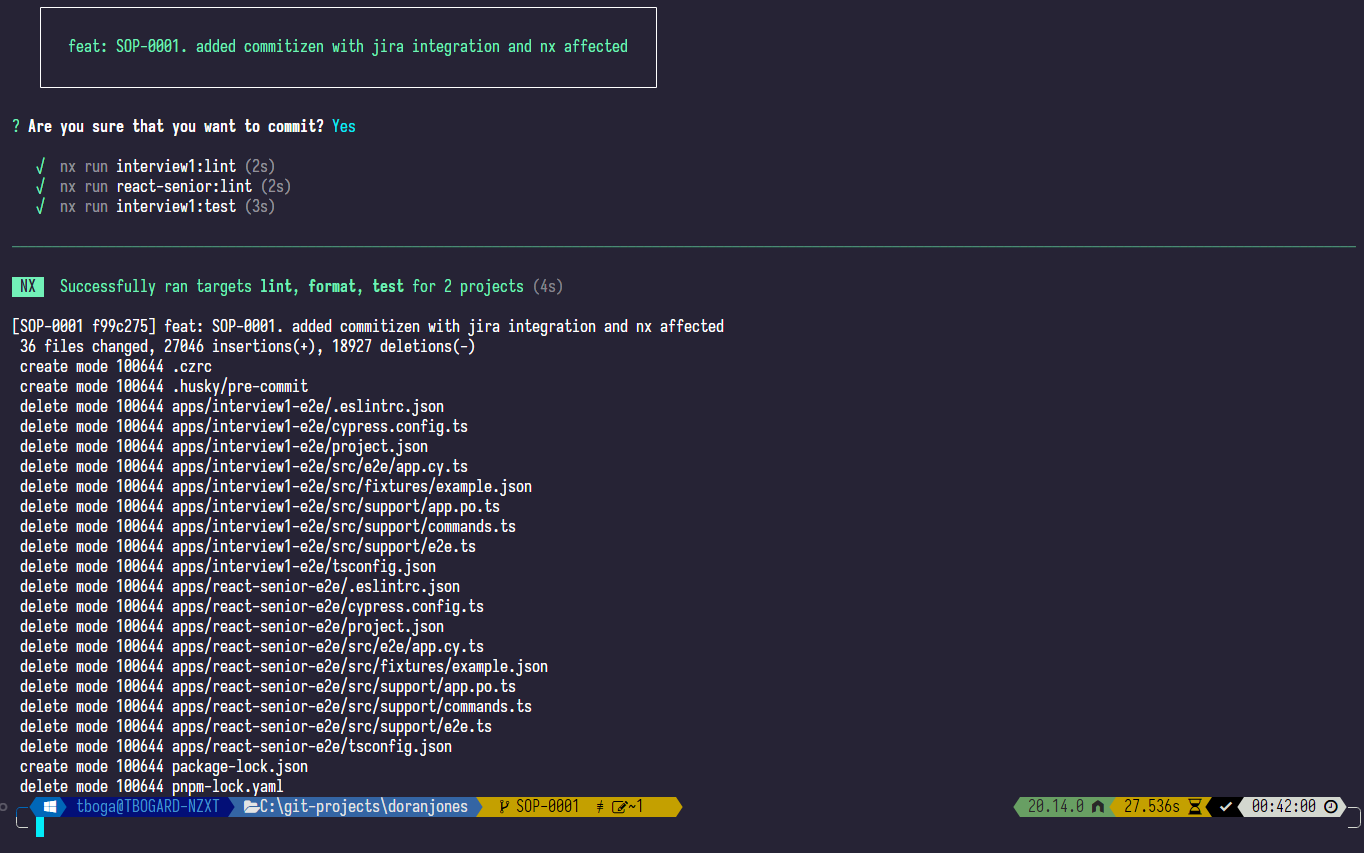
Success!!!
Nothing beats the satisfaction of conquering an agonizing Jira ticket, with everything running like clockwork, leading to a successful commit and flawless execution of all nx affected commands, culminating in this glorious screen:
Conclusion
So, I hope you’ve enjoyed this article. I’m open to your comments—and, of course, your horror stories about wrangling your team of developers into some semblance of a framework to keep things running smoothly.
Stay tuned for the next article—it might just be another untellable nightmare about software and architecture development, or perhaps a shiny piece on Angular's latest toys. Until I wake up from the next one, may your commits be clean and your CI pipeline merciful.