

Some time ago, I had the opportunity to start a simple application. Since I was the only developer and it was a charity project, I had the freedom to choose the tools. One of my main goals was to make the most of the newly released signals without losing the power of RxJS. This article is the result of a small part of that project and some of the implementations I made during the process of creating it.
But why write an article about pagination, you might be thinking. Because I believe it's a great example of how you can combine signals and observables to get the most out of both. Besides, I couldn't find another tutorial using these technologies on the internet. 😅
The Tools 🛠
Firebase 🔥
I chose Firebase because it provides everything I need: authentication, storage, and a real-time database. It simplifies my life significantly since I don't have to worry much about the backend.
NgRx SignalStore🚦
It took me a long time to make a decision, as I generally try to avoid using external libraries whenever possible. However, after reading several articles, comparing other solutions, and conducting some proof-of-concept tests, I chose SignalsStore because it met all my needs. Another valid alternative was signalsSlice, but although it is simpler, it is less powerful than SignalsStore.
Before the start 🚀
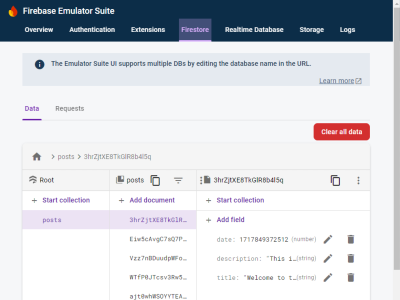
It's not entirely necessary, but if you want to follow the article in more detail, you can clone this repository with the example and check it throughout the article. It's preconfigured with Firebase emulators with preloaded data, and instructions on the README, so you can't complain that I didn't make it easy for you. 😊
If everything goes well, you should see the following:
The Implementation 🧑💻
The idea here is not to create a step-by-step guide, as that would be long and tedious. Instead, I will showcase the key components of the solution and explain the points or decisions that I found to add the most value. If you want to go deeper, you can always check the repository.
The Post and PostsListConfig interfaces 📝
Lets take a look at the Post and PostsListConfig interfaces:
export interface Post {
  id: string;
  title: string;
  description: string;
  date: number;
}

export interface PostsListConfig {
  limit: number;
  page: number;
  pageLastElements: Map<number, Post>;
}
The Post interface is a simple object with a few properties, nothing fancy.
The PostsListConfig interface is more interesting and is used to configure pagination for the posts. Here's a breakdown of its properties:
limit: The number of posts to display per page.page: The current page number.pageLastElements: A map storing the last post of each page, which helps manage pagination efficiently. We will go through this later.
The PostsService Class 🔧
Now lets take a look at the PostsService class.
  @Injectable({
    providedIn: 'root',
  })
  export class PostsService {
    private readonly PATH = 'posts';
    private readonly firestore = inject(Firestore);
    private readonly collection = collection(this.firestore, this.PATH).withConverter(assignTypes<Post>());

    getPosts$(config: PostsListConfig): Observable<Post[]> {
      const { limit: qLimit, page, pageLastElements } = config;
      const conditions: QueryConstraint[] = [orderBy('date', 'desc'), limit(qLimit)];

      let postCollection;
      if (page === 1) {
       const { date } = pageLastElements.get(page - 1)!;
      conditions.push(startAfter(date));
        postCollection = query(this.collection, orderBy('date', 'desc'), limit(qLimit));
      } else {
        const { date } = pageLastElements.get(page - 1)!;
        postCollection = query(this.collection, orderBy('date', 'desc'), limit(qLimit), startAfter(date));
      }
      return collectionData(postCollection, { idField: 'id' });
    }
  }
The PostsService handles data retrieval from Firestore, it worth to mention that im using AngularFire to simplify the process of interacting with Firestore.
We have 2 scenarios here:
Scenario 1: If the page is the first
query(this.collection, orderBy('date', 'desc'), limit(qLimit))
Being the first page, no pagination is required, so the query simply orders the posts by date in descending order and limits the results to the specified number (qLimit). This is the simplest scenario.
Scenario 2: If the page is not the first
query(this.collection, orderBy('date', 'desc'), limit(qLimit), startAfter(date))
Here, things get more interesting. Firebase doesn't support numerical offsets, so pagination is achieved using query cursors. This involves the startAt and startAfter methods, which require a reference to a document in the database. The difference between the two is:
startAt: Returns documents greater than or equal to the reference document.startAfter: Returns documents greater than the reference document.
Similarly, endAt and endBefore methods can define the end point for the query results.
So for be able to navigate forward and backward through the pages, we need to save the last document of each page in the pageLastElements map. So now using this reference we can go forward and backward in the collection. An important thing to take into account here is that in in this example the orderBy is hardcoded, but in case of dynamic sorting, we should use the order parameter in the startAfter methods.
The PostsStore 📦
Let's delve into one of the most interesting parts of this article: The PostsStore. The PostsStore holds the state of our application. As mentioned earlier, we will use the SignalStore from the ngrx/store library to create the store. But first, let's explain the store's model.
  export type StatusType = 'loaded' | 'loading' | 'success' | 'error';

  export interface Posts {
    entities: Post[];
    entitiesCount: number;
  }

  export interface PostListState {
    listConfig: PostsListConfig;
    posts: Posts
    status: StatusType;
  }

  export const postListInitialState: PostListState = {
    listConfig: {
      page: 1,
      limit: 4,
      pageLastElements: new Map<number, Post>(),
    },
    posts: {
      entities: [],
      entitiesCount: 0,
    },
    status: 'loading',
  };
As you can se from the code above, we have a PostListState interface that defines the state of our store. It holds the listConfig (which we are already familiar with), the posts and the status. The posts attribute holds the posts and the count of posts, while the status attribute indicates the current status of the store. This status is useful for displaying loaders or error/success messages.
The initial state, postListInitialState, simply sets up a starting configuration for the post list.
Now that we have our state, we can check the PostsStore:
  export const PostsListStore = signalStore(
    { providedIn: 'root' },
    withState<PostListState>(postListInitialState),
    withComputed(store => ({
      paginator: computed(() => ({
        show: store.listConfig.page() > 1 || store.posts.entitiesCount() === store.listConfig.limit(),
        hasPreviousPage: store.listConfig.page() > 1,
        hasNextPage: store.posts.entitiesCount() === store.listConfig.limit(),
      })),
    })),
    withMethods((store, service = inject(PostsService)) => ({
      loadPosts: rxMethod<PostsListConfig>(
        pipe(
          tap(() => patchState(store, { status: 'loading' })),
          switchMap(listConfig =>
            service.getPosts$(listConfig).pipe(
              tapResponse({
                next: (entities: Post[]) => {
                  const newListConfig = listConfig.pageLastElements.set(listConfig.page, entities[entities.length - 1]);
                  patchState(store, {
                    posts: { entitiesCount: entities.length, entities },
                    listConfig: {
                      ...listConfig,
                      pageLastElements: newListConfig,
                    },
                    status: 'success',
                  });
                },
                error: () => {
                  patchState(store, { ...postListInitialState }, { status: 'error' });
                },
              })
            )
          )
        )
      ),
    }))
  );
This may look complicated, but it's actually quite simple if we break it down.
- The
withStatefeature adds state properties to theSignalStore, accepting the initial state as an input argument. - The
withComputedfeature is used to add computed properties to theSignalStore. - The
withMethodsfeature is used to add methods to theSignalStore.
In our case since the withState feature is simple enough, we will not go into detail about it. So let's start with the withComputed feature:
We use withComputed to determine the visibility of the paginator based on the current page and the number of entities in the store. This ensures that the paginator buttons are displayed only when needed, which we will see in action later.
For the withMethods feature, we use rxMethod to create a method called loadPosts. This method receives a PostsListConfig object and returns an Observable that loads the posts based on the configuration.
If we look closely at the tapResponse, we can see how we update the pageLastElements map and then add it to the state using patchState. Additionally, we manage the status by setting it to loading initially, and then to success or error based on the outcome of the data fetch.
The PostsComponent 💻
Now we can start with the most exciting part of the project: using our store to display the posts. One of the best things about SignalStore is that it is incredibly easy to use—we only need to inject it and utilize its features. We can consume the state signals like posts or call methods like loadPosts. Additionally, we can use the computed function to create a computed property that updates when the store changes. In our case, we have $isLoading.
  export class PostsListComponent {
    readonly listStore = inject(PostsListStore);

    $posts = this.listStore.posts.entities;
    $isLoading = computed(() => this.listStore.status() === 'loading');
    $listConfig = this.listStore.listConfig;

    constructor() {
      this.listStore.loadPosts(this.$listConfig());
    }

    goToNextPage() {
      this.listStore.loadPosts({ ...this.$listConfig(), page: this.$listConfig.page() + 1 });
      window.scroll({ top: 0, left: 0, behavior: 'smooth' });
    }

    goToPrevPage() {
      this.listStore.loadPosts({ ...this.$listConfig(), page: this.$listConfig.page() - 1 });
      window.scroll({ top: 0, left: 0, behavior: 'smooth' });
    }
  }
  <div class="w-full pt-6">
    <div class="flex justify-content-center grid grid-cols-4 gap-4 mb-4">
      @if (!$isLoading()) {
        @for (post of $posts().values(); track post.id) {
          <post-card
            class="w-full max-w-20rem"
            [$post]="post" />
        }
        <paginator
          class="w-full"
          (onNextClicked)="goToNextPage()"
          (onPrevClicked)="goToPrevPage()"
          [$paginator]="listStore.paginator()" />
      } @else {
        <post-card-skeleton [$quantity]="listStore.listConfig.limit()" />
      }
    </div>
  </div>
The PaginatorComponent 💻
To wrap up this article, as promised, let's examine the PaginatorComponent. This component uses signal inputs and outputs to manage the visibility of the paginator and the buttons for navigating to the previous and next pages. As you can see, the component is quite straightforward and easy to understand.
  @if ($paginator().show) {
    <div class="flex justify-content-between">
      <p-button
        icon="pi pi-arrow-left"
        label="Previous"
        [disabled]="!$paginator().hasPreviousPage"
        [rounded]="true"
        (onClick)="onPrevClicked.emit()"
        [raised]="true"></p-button>

      <p-button
        icon="pi pi-arrow-right"
        label="Next"
        [disabled]="!$paginator().hasNextPage"
        [rounded]="true"
        [raised]="true"
        (onClick)="onNextClicked.emit()"></p-button>
    </div>
  }
  export class PaginatorComponent {
    $paginator = input.required<PaginatorConfig>();
    onNextClicked = output<void>();
    onPrevClicked = output<void>();
  }
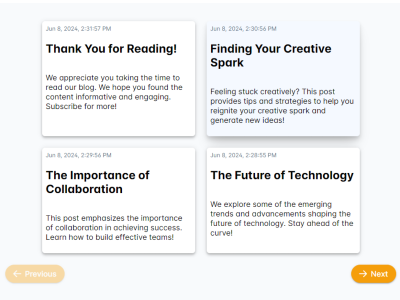
The Demo 🎨
If you haven't downloaded the repository, you can view the demo below.
Notice that because we are using a rxMethod, the loaded posts remain connected with the Firebase database, allowing you to see changes in real time.
In case you haven't downloaded the repository, you can view the demo below:
Notice that because we are using a rxMethod the loaded posts remain connected with the firebase database, so you can see the changes in real time.
Final demo
Thank you for following along! I hope this guide helps you create pagination using Firebase in the future and, more importantly, improves your skills with Signals.
And remember, you can check the repository to view the code and run the demo yourself.