

In this article, you will learn the essentials of working with dynamic component injection as a part of the logic of the component.
Before you start, a replica of this work is available in this link in stackblitz.
Injecting an arbitrary component inside of a component
One of the most fascinating features Angular offers is related to component injection. Component injection is a technique that allows a component of your choice to be injected inside another component. This is particularly valuable as modern websites are often composed in such a way that allows for this flexibility.
How I do that?
Recommended Approach for Angular 17+ projects
- If you are using a Standalone Component, your components have to be declared in your imports section:
// If I were to use this component to be dynamically imported along other compoents
@Component({
  standalone: true,
  selector: 'profile-photo',
})
export class ProfilePhoto { }

@Component({
  standalone: true,
  imports: [ProfilePhoto], //then this is the place where it should be declared
  templateUrl: 'userProfile.component.html'
})
export class UserProfile { }
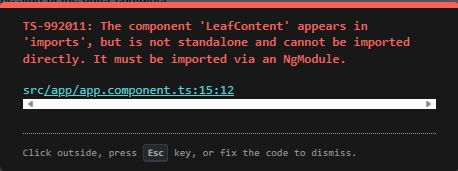
Important note here: If you are using standalone components, all the other components in the operation, needs to be standalone as well. Importing a component that is not standalone will require you to import the respective module that includes the declaration of such component.
Implementation
Now that we know the basics, let's create a small project where we will dynamically inject two components inside a component template:
- The UI should show two buttons, each one calling the respective component into the DOM.
- The respective component should follow the DOM flow, avoiding overlap or deleting previously injected components.
- Each component, when clicked, should remove itself.
Composition
Injecting a component is probably the easiest job inside the context of a component; however, the component will be placed arbitrarily at the end of its body. If you want to place things in the right place, it is advised to use a ng-container to ensure the right area where the components will be injected into the view.
First, let's create our host component where we will do most of the work. There are diverse ways to project content into a component, but I find using ViewContainerRefto be the simplest way to achieve this approach.
Let's create an Angular component that will be the host of our application, with two buttons:
import {Component, ViewContainerRef, inject} from "@angular/core";

@Component({
  standalone: true,
  selector:'app-root',
  template: `
  <button type="button" (click)="injectC1()" >Inject Component 1</button>
  <button type="button" (click)="injectC2()" >Inject Component 2</button>
  `
})
export class AppComponent {
  private viewContainerRef = inject(ViewContainerRef);

  public injectC1(){
    //inject component1
  }

  public injectC2() {
    // inject component2
  }
}
So far, so good. We defined a private viewContainerRef that will ensure any component can be injected into the component that invokes it. Now let's create two child components that will be injected into the component, and make the buttons execute the injection
import {Component, ViewContainerRef, inject} from "@angular/core";

@Component({
  standalone: true,
  selector:'app-component1',
  styleUrl :'c1.css',
  template: `
  <div class="c1">This is Component 1</div>
  `
})
export class Component1 {}

@Component({
  standalone: true,
  selector:'app-component2',
  styleUrl :'c2.css',
  template: `
  <div class="c2">This is Component 2</div>
  `
})
export class Component2 {}
In addition, we add the injection of components on the desired functions:
@Component({
...
})
export class AppComponent {
  private viewContainerRef = inject(ViewContainerRef);

  public injectC1(){
+    this.viewContainerRef.createComponent(Component1)
  }

  public injectC2() {
+    this.viewContainerRef.createComponent(Component2)
  }
}
finally, let's create the stylesheets for each component:
| main.css |
|---|
.grid {
  margin-top:5px;
  display:grid;
  grid-template-columns: repeat(2, minmax(0, 1fr));
  gap:5px;
}
.container {
  border: 1px solid green;
}
| c1.css |
|---|
.c1{
  background-color:#FF0000;
  color:#FFF;
}
| c2.css |
|---|
.c2{
  background-color:#0000FF;
  color:#FFF;
}
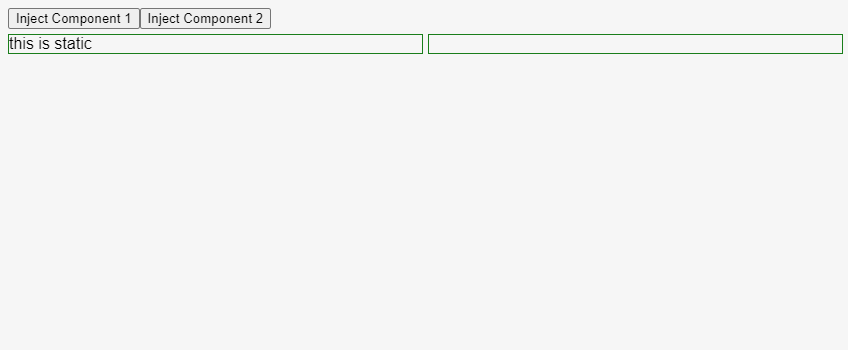
The result will look like this. Note that, from the perspective of the component, injected components without a specific container will be placed at the end of the invoking component, which is AppComponent.

However, as a demo, it works nicely, but what if we have to inject components in a specific area of the page? Let's create in the AppComponent two columns in a grid where one is static and one is supposed to be the target of our injected components:
@Component({
 ...
  template: `
  <button type="button" (click)="injectC1()" >Inject Component 1</button>
  <button type="button" (click)="injectC2()" >Inject Component 2</button>
+ <div class="grid">
+   <div class="container">this is static</div>
+    <div class="container">this is dynamic</div>
+ </div>
  `
})
export class AppComponent {
...
}
Using ng-container
To determine the target, we might want to use an ng-container with a name on it in our AppComponent, so we can use it to programatically inject content in such space. We will use @ViewChild to target the right space named by the ng-container.
@Component({
...
,
  template: `
  <button type="button" (click)="injectC1()" >Inject Component 1</button>
  <button type="button" (click)="injectC2()" >Inject Component 2</button>
  <div class="grid">
    <div class="container">this is static</div>
    <div class="container">
+    <ng-container #targetSpace />
    </div>
  </div>
  `
})
export class AppComponent {
- private viewContainerRef = inject(ViewContainerRef);
+  @ViewChild('targetSpace', {
+    read: ViewContainerRef
+  })
+  private targetSpace!:ViewContainerRef;

  public injectC1(){
+    this.targetSpace.createComponent(Component1)
-    this.viewContainerRef.createComponent(Component1)
  }

  public injectC2() {
+    this.targetSpace.createComponent(Component2)
-    this.viewContainerRef.createComponent(Component2)
  }
}
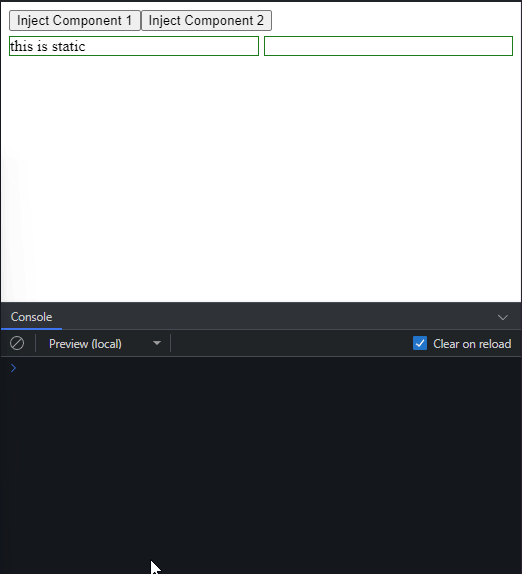
The resultant code now injects into the ng-container #targetSpace the components programatically:

Clicked components remove themselves from the DOM
To achieve this, we need to trigger an event, and for that, we will use the function output. You probably saw @Output, which is a decorator and has the same result as output. When the component is clicked, we will emit the event through the output, so the parent component can resolve accordingly.
For Component1 and Component2 we will create the respective output events and the event handler that will trigger the behavior to emit the click event. As clicked is public, we can execute the emit event on the template using clicked.emit()
+ import {Component, ViewChild, ViewContainerRef, output} from "@angular/core";

@Component({
...
template: `
-  <div class="c1">This is Component 1</div>
+  <div class="c1" (click)="clicked.emit()">This is Component 1</div>
  `
})
export class Component1 {
+  public clicked = output<void>()
}

@Component({
...
template: `
- <div class="c2">This is Component 2</div>
+ <div class="c2" (click)="clicked.emit()">This is Component 2</div>
  `
})
export class Component2 {
+  public clicked = output<void>()
}
To keep the logic of removing the element on the parent element, we need to call the reference of the created component so when clicked, it can be removed. Output events are subscribable, so in AppComponent you want to use the subscribe method for the instance of the component event (in this case clicked for each injected component).
Each time a component is injected, a reference in memory keeps a pointer to that component. This ensures that each component occupies a specific space in memory, eliminating the risk of closing the wrong component. Understanding the concept of a reference and instance in JavaScript/TypeScript is crucial, especially in complex cases, as it helps to understand how to manage and access these components effectively..
@Component({
 ...
})
export class AppComponent {
  ...

 public injectC1(){
-   this.targetSpace.createComponent(Component1)
+    const componentRef = this.targetSpace.createComponent(Component1)
+    componentRef.instance.clicked
+    .subscribe( () => {
+      componentRef.destroy();
+    })
  }

  public injectC2() {
-   this.targetSpace.createComponent(Component2)
+    const componentRef = this.targetSpace.createComponent(Component2)
+    componentRef.instance.clicked
+    .subscribe( () => {
+      componentRef.destroy();
+    })
  }
}
Voila! now each component, when clicked, will remove itself:
Handling component destruction events
As we dinamycally inject components, and destroy them on the fly, we should ask ourselves what should happen when a component is destroyed. We can use some of the new features of Angular 17 to make this task a less daunting one.
TakeUntilDestroyed, OutputToObservable and DestroyRef implementation
With TakeUntilDestroy along with OutputToObservable will help with the task of converting our output event into an observable one. However, we need to first ensure that a Destroy Reference is available on each component. For this we will use DestroyRef on the ngOnInit to ensure that some action needs to be triggered on each child component as the component is unmounted from the UI.
Note that on Angular 16+, ngOnDestroy became optional as we are using now DestroyRef to indicate the component to do something once the component is destroyed.
@Component({
 ...
})
- export class Component1 {
+ export class Component1 implements OnInit {
+  public destroyRef = inject(DestroyRef);
  public clicked = output<void>();

+  ngOnInit() {
+    this.destroyRef.onDestroy(() => {
+      console.log('Component 1 was destroyed');
+    });
+  }
}

@Component({
 ...
})
- export class Component2 {
+ export class Component2 implements OnInit {
+  public destroyRef = inject(DestroyRef);
  public clicked = output<void>();

+  ngOnInit() {
+    this.destroyRef.onDestroy(() => {
+      console.log('Component 2 was destroyed');
+    });
+  }
}
DestroyRef will be executed when the component is destroyed, and what we will see, is that, once destroyed, we should see the respective message on the terminal. Now let's focus on the AppComponent to add the respective logic for our clicked event to become an observable
import {
  ViewContainerRef,
  Component,
  ViewChild,
  provideExperimentalZonelessChangeDetection,
  output,
  inject,
  DestroyRef,
  OnInit,
} from '@angular/core';

import { bootstrapApplication } from '@angular/platform-browser';

+ import {
+  outputToObservable,
+  takeUntilDestroyed,
+ } from '@angular/core/rxjs-interop';


...

@Component({
 ...
})
export class AppComponent {
  @ViewChild('targetSpace', {
    read: ViewContainerRef,
  })
  private targetSpace!: ViewContainerRef;

  public injectC1() {
    const componentRef = this.targetSpace.createComponent(Component1);
-    componentRef.instance.clicked.subscribe(() => {
+    outputToObservable(componentRef.instance.clicked)
+      .pipe(takeUntilDestroyed(componentRef.instance.destroyRef))
+      .subscribe(() => {
+        componentRef.destroy();
+      });
  }

  public injectC2() {
    const componentRef = this.targetSpace.createComponent(Component2);
-    componentRef.instance.clicked.subscribe(() => {
+    outputToObservable(componentRef.instance.clicked)
+      .pipe(takeUntilDestroyed(componentRef.instance.destroyRef))
+      .subscribe(() => {
+        componentRef.destroy();
+      });
  }
}
Once we have the OutputToObservable on place, we can pipe the response of the observable to use TakeUntilDestroy, which takes as a parameter the public destroyRef reference of the instantiated component.
With this in mind, now we will see the respective console.log of each referenced component when destroyed:
Final Code
This is the final resultant code.
| main.ts |
|---|
import {
  ViewContainerRef,
  Component,
  ViewChild,
  provideExperimentalZonelessChangeDetection,
  output,
  inject,
  DestroyRef,
  OnInit,
} from '@angular/core';
import {
  outputToObservable,
  takeUntilDestroyed,
} from '@angular/core/rxjs-interop';
import { bootstrapApplication } from '@angular/platform-browser';

@Component({
  standalone: true,
  selector: 'app-component1',
  styleUrl: 'c1.css',
  template: `
  <div class="c1" (click)="clicked.emit()">This is Component 1</div>
  `,
})
export class Component1 implements OnInit {
  public destroyRef = inject(DestroyRef);
  public clicked = output<void>();

  ngOnInit() {
    this.destroyRef.onDestroy(() => {
      console.log('Component 1 was destroyed');
    });
  }
}

@Component({
  standalone: true,
  selector: 'app-component2',
  styleUrl: 'c2.css',
  template: `
  <div class="c2" (click)="clicked.emit()">This is Component 2</div>
  `,
})
export class Component2 {
  public destroyRef = inject(DestroyRef);
  public clicked = output<void>();

  ngOnInit() {
    this.destroyRef.onDestroy(() => {
      console.log('Component 2 was destroyed');
    });
  }
}

@Component({
  standalone: true,
  imports: [Component1, Component2],
  selector: 'app-root',
  styleUrl: 'main.css',
  template: `
  <button type="button" (click)="injectC1()" >Inject Component 1</button>
  <button type="button" (click)="injectC2()" >Inject Component 2</button>
  <div class="grid">
    <div class="container">this is static</div>
    <div class="container">
    <ng-container #targetSpace />
    </div>
  </div>
  `,
})
export class AppComponent {
  @ViewChild('targetSpace', {
    read: ViewContainerRef,
  })
  private targetSpace!: ViewContainerRef;

  public injectC1() {
    const componentRef = this.targetSpace.createComponent(Component1);
    outputToObservable(componentRef.instance.clicked)
      .pipe(takeUntilDestroyed(componentRef.instance.destroyRef))
      .subscribe(() => {
        componentRef.destroy();
      });
  }

  public injectC2() {
    const componentRef = this.targetSpace.createComponent(Component2);
    outputToObservable(componentRef.instance.clicked)
      .pipe(takeUntilDestroyed(componentRef.instance.destroyRef))
      .subscribe(() => {
        componentRef.destroy();
      });
  }
}

bootstrapApplication(AppComponent, {
  providers: [provideExperimentalZonelessChangeDetection()],
});
| main.css |
|---|
.grid {
  margin-top:5px;
  display:grid;
  grid-template-columns: repeat(2, minmax(0, 1fr));
  gap:5px;
}
.container {
  border: 1px solid green;
}
| c1.css |
|---|
.c1{
  background-color:#FF0000;
  color:#FFF;
}
| c2.css |
|---|
.c2{
  background-color:#0000FF;
  color:#FFF;
}
Appendixes
Working with Modules
It is possible that you will encounter a project with a module. Previous versions of Angular, prior to version 16, used modules to group components and other Angular features to organize your code. However, this approach was not very effective from the perspective of developer experience (you spend more time grouping/organizing code than creating features to work right away). If you are using a module in your project, the needed components for injection have to be declared in the declarations section:
@NgModule({
  /**
   * Declare your components to be injected in the declarations section
   */
  declarations: [
    AppComponent, // your main component
    ComponentToInject1, // component to be used on programatic injection
    ComponentToInject2, // component to be used on programatic injection
  ],
  imports: [BrowserModule],
  providers: [CurrentDateService],
  bootstrap: [AppComponent],
})
export class AppModule {}
Most of the code from the standalone approach will work here. Standalone components can't work along with Angular Modules, so you have to remove the definition for standalone in your component:
@Component({
-  standalone: true,
  selector:'app-component2',
  styleUrl:'c2.css',
 template: `
  <div class="c2" (click)="clicked.emit()">This is Component 1</div>
  `
})
export class Component2 {
  public clicked = output<void>()
}
The only part that needs to be considered is the definition of the module and how it will load in the final code.
This is how the final code looks like now with a module:
| main.ts |
|---|
import {platformBrowser} from '@angular/platform-browser';
import { AppModule } from './app.module';

platformBrowser()
  .bootstrapModule(AppModule)
  .catch((err) => console.error(err));
| app,module.ts |
|---|
import { NgModule } from '@angular/core';
import { BrowserModule } from '@angular/platform-browser';

import { AppComponent } from './app.component';
import {Component1} from './c1.component';
import {Component2} from './c2.component';

@NgModule({
  declarations: [
    AppComponent,
    Component1,
    Component2,
  ],
  imports: [BrowserModule],
  providers: [],
  bootstrap: [AppComponent],
})
export class AppModule {}
| app.component.ts |
|---|
import {Component, ViewChild, ViewContainerRef} from "@angular/core";
import {Component1} from "./c1.component";
import {Component2} from "./c2.component";

@Component({
  selector:'app-root',
  styleUrl:'main.css',
  template: `
  <button type="button" (click)="injectC1()" >Inject Component 1</button>
  <button type="button" (click)="injectC2()" >Inject Component 2</button>
  <div class="grid">
    <div class="container">this is static</div>
    <div class="container">
    <ng-container #targetSpace />
    </div>
  </div>
  `
})
export class AppComponent {
  @ViewChild('targetSpace', {
    read: ViewContainerRef
  })
  private targetSpace!:ViewContainerRef;

  public injectC1(){
    const componentRef = this.targetSpace.createComponent(Component1)
    componentRef.instance.clicked
    .subscribe( () => {
      componentRef.destroy();
    })
  }

  public injectC2() {
    const componentRef = this.targetSpace.createComponent(Component2)
    componentRef.instance.clicked
    .subscribe( () => {
      componentRef.destroy();
    })
  }
}
| c1.component.ts |
|---|
import {Component, output} from "@angular/core";

@Component({
  selector:'app-component1',
  styleUrl :'c1.css',
  template: `
  <div class="c1" (click)="clicked.emit()">This is Component 1</div>
  `
})
export class Component1 {
  public clicked = output<void>()
}
| c2.component.ts |
|---|
import {Component, output} from "@angular/core";

@Component({
  selector:'app-component2',
  styleUrl :'c2.css',
  template: `
  <div class="c2" (click)="clicked.emit()">This is Component 2</div>
  `
})
export class Component2 {
  public clicked = output<void>()
}
| main.css |
|---|
.grid {
  margin-top:5px;
  display:grid;
  grid-template-columns: repeat(2, minmax(0, 1fr));
  gap:5px;
}
.container {
  border: 1px solid green;
}
| c1.css |
|---|
.c1{
  background-color:#FF0000;
  color:#FFF;
}
| c2.css |
|---|
.c2{
  background-color:#FF0000;
  color:#FFF;
}
Summary
Understanding how programatic injection works can lower down the architecture complexity of applications, making those quite maintainable and easy to operate. I hope you enjoyed this reading.

Note 1: I have added notes regarding component destruction events and how to handle this on the context of this exercise (June 10th, 2024). Shoutouts to Jeff Getzin who pointed out the need of documenting the handling of this kind of event.
